Boy Owl with Pencil: Integrating Machine Applique Into Your Back-to-School Workflow
Machine embroidery offers a unique intersection of creativity and precision, and few designs capture that blend as effectively as the Boy Owl with Pencil applique. This design is more than a decorative element; it is a reusable asset that can be planned, scaled, and integrated into a wide range of projects. Whether you are a small business owner preparing a seasonal product line, a hobbyist looking to personalize gifts, or an educator creating classroom materials, understanding how to work with this design from preparation through execution will save you time and ensure consistent results.
This article walks through the practical aspects of using the Boy Owl with Pencil design: what it requires, how to prepare for it, where it fits in a project timeline, and how to maintain quality across multiple uses. The goal is to help you treat this design as a repeatable component of your workflow rather than a one-off project.
What the Boy Owl with Pencil Design Actually Is
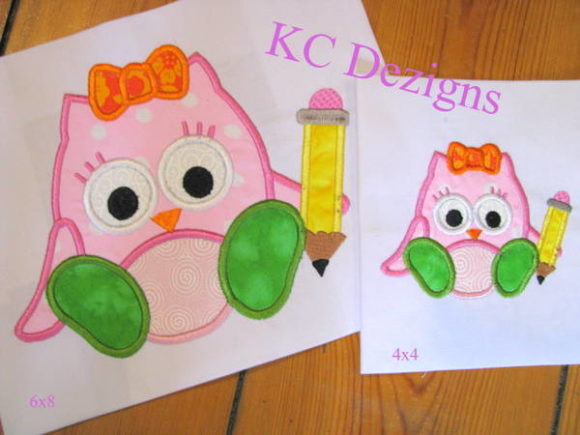
The Boy Owl with Pencil is a machine applique embroidery design depicting an owl holding a pencil, created specifically for stitching onto fabric. It is not a standalone graphic or a print-and-cut file. To use it, you need an embroidery machine and compatible software that can read the supplied file formats. The design comes in three different hoop sizes, giving you flexibility depending on the item you are embellishing.
Applique embroidery combines fabric pieces stitched onto a base material with embroidery stitches that secure the edges and add detail. In this design, the owl and pencil are built from layered fabric shapes, with embroidery providing the outlines, facial features, and textural accents. The result is a dimensional, tactile finish that stands out from standard satin-stitch embroidery.
The design is delivered in multiple embroidery file formats, which means it can be used with machines from various manufacturers, including Brother, Janome, Singer, Pfaff, and Husqvarna Viking, among others. This multi-format approach eliminates the need to convert files manually, reducing friction at the start of a project.
Planning Before You Stitch: Hoop Size, Fabric, and Stabilizer
The most important decision you will make before touching the start button is which hoop size to use. The Boy Owl with Pencil is available in three hoop sizes, and your choice affects both the final dimensions of the design and the type of item you can stitch it onto.
- Small hoop (typically 4x4 or similar): Best for pencil cases, bookmarks, patch pockets, or small tote bags.
- Medium hoop (5x7 or similar): Suitable for t-shirts, pillowcases, aprons, or the front of a backpack.
- Large hoop (6x10 or larger): Ideal for hoodies, large tote bags, quilts, or jacket backs.
Selecting the hoop size is not just about fitting the design; it is about matching the scale of the final item. A large owl on a small pencil case will overwhelm the object, while a tiny owl on a hoodie will be hard to read. Measure your base fabric, consider the placement area, and choose the hoop size that gives the design proportional weight.
Stabilizer selection is equally critical. For applique, a tear-away or cut-away stabilizer works well depending on the fabric type. Stretchy fabrics such as jersey knit require a cut-away stabilizer to prevent distortion during stitching. Woven fabrics like cotton or linen can use a tear-away stabilizer, which removes cleanly after stitching. Testing a small sample on scrap fabric before committing to the final item is a workflow step that professionals rarely skip.
Understanding File Formats and Machine Compatibility
One of the practical advantages of the Boy Owl with Pencil design is that it arrives in multiple embroidery file formats. This means you do not need to own conversion software or manually re-digitize the design. The most common formats included are:
- .PES (Brother, Babylock, Bernina)
- .DST (Tajima, and widely compatible with many machines)
- .EXP (Melco, Bernina)
- .JEF (Janome)
- .VP3 (Husqvarna Viking, Pfaff)
- .XXX (Singer, and various generic formats)
Before transferring the file to your machine, verify that the format matches your machine's native format. If you use a Brother machine, the .PES file is typically the correct choice. If your machine reads .DST natively, use that. Most modern embroidery machines can read multiple formats, but checking the manual or testing with a small stitch-out prevents mid-project surprises.
If you use embroidery software to edit, resize, or combine designs, the Boy Owl with Pencil can be imported as a single object. However, because it is an applique design, resizing beyond the intended hoop sizes may distort the fabric layering sequence. Keep the design at or near its original dimensions for best results.
Where This Design Fits in a Broader Project Workflow
The Boy Owl with Pencil is not a standalone project; it is a component that you integrate into a larger item or product line. Understanding where it fits in your workflow helps you sequence tasks efficiently.
Before the Project: Sourcing and Preparation
When planning a back-to-school product line or a set of personalized gifts, the design selection should happen early. Decide which items will feature the owl, and in which hoop size. Order your base materials — fabric blanks, thread colors, and stabilizer — in a single batch. This prevents delays midway through production. If you are creating multiple items with the same design, stitch them in a single session to maintain consistency in tension, thread color, and placement.
During the Project: Stitching Sequence and Placement
Applique designs require you to pause the machine during stitching to place fabric pieces. The Boy Owl with Pencil design is digitized so that the machine stitches a placement line, then stops for you to lay down the first fabric piece (typically the owl's body). After securing that piece with a tack-down stitch, the machine may stop again for subsequent layers such as the pencil, the owl's eyes, or the hat. Plan your workspace so that pre-cut fabric pieces are within reach, sorted by order of placement. Labeling each piece with a sticky note or storing them in numbered bags saves time and reduces errors.
After the Project: Trimming, Finishing, and Quality Review
Once stitching is complete, remove the item from the hoop and trim excess stabilizer. For tear-away stabilizer, gently tear along the edges. For cut-away, use sharp scissors to trim close to the stitches without cutting the thread. Inspect the design for skipped stitches, loose threads, or fabric shifting. If the design will be washed, consider using a pressing cloth to protect the stitches during ironing. For items intended for children, check that all fabric edges are fully enclosed by stitches to prevent fraying after repeated use.
Practical Implementation Tips for Consistent Results
Consistency across multiple stitch-outs is what separates one-off hobby work from scalable production. Here are specific practices that apply directly to the Boy Owl with Pencil design:
- Use the same thread brand and type for all stitch-outs. Different threads have different thicknesses and sheen, which can alter the appearance of the design.
- Pre-wash fabric blanks if the final item will be washed. Shrinkage can distort the design if the base fabric shrinks more than the stabilizer.
- Mark placement guides on the fabric using a water-soluble pen. The design's center point and horizontal axis should be clearly marked before hooping.
- Hoop the stabilizer and fabric together smoothly, without stretching. Applique designs rely on flat fabric for accurate layering.
- Save your project file in your embroidery software after the first successful stitch-out. This preserves your thread colors, hoop size, and any edits you made.
Quality Control and Long-Term Use
The Boy Owl with Pencil design can be used for years if you store the files properly and maintain your equipment. Organize your digital files by theme or project type — for example, a folder named "Back to School" containing this design along with related motifs. Back up the files to cloud storage or an external drive. If you purchase the design from an online shop, save the original download in case you need to re-download formats for a future machine.
Thread tension should be checked at the start of each stitching session. Applique designs place stress on the thread during tack-down and satin stitching, and incorrect tension can cause thread breaks or visible bobbin thread on the top of the design. Stitch out a small test of the design on scrap fabric before loading the final item, especially if you have not used the design in a while.
If you are creating items for sale, keep a production log. Note the hoop size used, the fabric type, the stabilizer, and any placement adjustments. This log becomes a reference that saves time when you repeat the project months later.
Integrating the Design Into Different Use Cases
The Boy Owl with Pencil adapts to several real-world scenarios beyond a single project. Here are three examples of how different users might incorporate it into their routines:
Small business owner: Create a limited back-to-school collection featuring the owl on pencil cases, lunch bags, and drawstring backpacks. Offer the design in two hoop sizes so customers can choose between a small accent and a larger focal graphic. Batch-produce the items over two days: one day for cutting and hooping, one day for stitching and finishing.
Freelance crafter or seller: Offer a personalization service where customers provide the item and you stitch the design onto it. Keep a sample stitched out on white cotton to show prospective buyers the size and detail. This builds trust and helps customers choose the right hoop size for their item.
Parent or educator: Stitch the design onto a simple tote bag for a teacher gift, or onto a library book bag for a child. Because the design comes in multiple hoop sizes, you can scale it to fit a small pouch or a large canvas bag. The applique fabric can be chosen to match school colors or the child's favorite shade.
Making the Design Part of a Repeatable Process
The strength of a well-digitized applique design like Boy Owl with Pencil is that it can be used as a repeatable building block. Once you have tested the thread colors, fabric placements, and hoop size, you have a predictable component that fits into a larger production process. This is especially valuable if you create items for market or make multiple gifts for a classroom or team.
Treat the design as an asset. Store the file in a logical folder, keep notes on your preferred settings, and re-order thread colors when they run low. When the next back-to-school season arrives, you can pick up where you left off without re-testing or re-learning the design.
The Boy Owl with Pencil is not a complicated design, but like any machine embroidery project, it rewards careful preparation and attention to process. By planning your hoop size, preparing your materials, and running a test stitch-out, you set yourself up for clean, consistent results every time you use it.