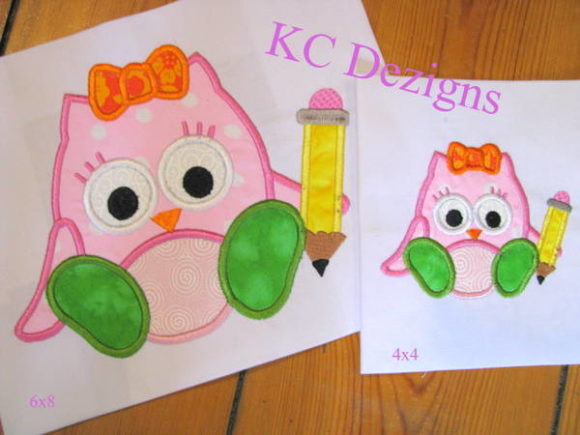
Owl with Pencil: A Versatile Machine Embroidery Design for Back-to-School Projects
Machine embroidery adds a layer of personalization and durability that other decorating methods simply cannot match. When you are planning projects for the back-to-school season, having a design that is both charming and practical can make all the difference. The Owl with Pencil machine applique embroidery design brings together whimsy and utility in a single stitch-out. This article walks through what this design offers, how it fits into real embroidery workflows, and how you can integrate it smoothly into your own projects, whether you are a hobbyist, a small business owner, or a teacher creating classroom materials.
Understanding the Owl with Pencil Design
This is a machine applique embroidery design, which means it uses fabric pieces stitched onto a base fabric to create the image. The design features a cute owl paired with a pencil, making it an ideal motif for school-related items. Because it is an applique design, it requires a few more steps than a standard embroidery-only file, but the result is a raised, textured patch of fabric that adds depth and visual interest.
The design is available in three different hoop sizes, giving you flexibility depending on the project. A smaller hoop size works well for pencil cases, bookmarks, or lapel patches. A medium size fits nicely on tote bags, lunch sacks, or notebook covers. The largest hoop size is suited for backpacks, jackets, or larger banners. Having multiple size options means you can scale the design to match the item without distorting the proportions.
From a technical standpoint, this design comes with multiple embroidery file formats. That includes common formats like PES, DST, EXP, JEF, VP3, and others. This wide format support ensures compatibility with most embroidery machines, including Brother, Janome, Bernina, Husqvarna Viking, Pfaff, and Singer. You do not need to convert files or worry about whether your machine can read the design. You simply download the format your machine uses and load it into your embroidery software or directly onto your machine if it supports USB or card transfer.
It is important to note that this is a machine embroidery design, not a hand embroidery pattern. You will need an embroidery machine and appropriate software to load and edit the design. If you are new to machine applique, the design includes clear layering and stitch paths, which helps you sequence the fabric placement and stitching steps correctly.
Where the Owl with Pencil Fits in Your Workflow
Integrating this design into your workflow can happen at several stages of a project, depending on how you plan, purchase, and produce embroidered items. Understanding where it fits helps you avoid last-minute scrambling and ensures a smooth process from start to finish.
Before the Project: Planning and Preparation
If you are mapping out a series of back-to-school projects, the Owl with Pencil design should be selected early in the planning phase. This allows you to determine which hoop sizes you need, what fabrics and stabilizers to stock, and how many items you can produce within your timeline. For example, if you plan to make 20 pencil cases for a school fundraiser, you need to know that each stitch-out takes roughly 15 to 25 minutes, depending on hoop size and machine speed. Ordering the design well ahead of time also gives you the opportunity to test stitch it on scrap fabric to confirm thread colors and tension settings.
If you are a small business owner creating a product line, consider this design as a recurring motif across multiple items. An owl with a pencil can appear on pouches, keychains, tags, and even as a patch sewn onto apparel. Planning this consistency upfront makes your product line feel cohesive and professional.
During the Project: Stitching and Assembly
When you move into the stitching phase, the Owl with Pencil design integrates with your existing embroidery routine. Applique requires you to place fabric pieces over the design area, then let the machine stitch the tack-down and satin borders. The design includes a placement stitch that marks where to lay your fabric, followed by a tack-down stitch that holds the fabric in place, and finally a satin stitch that covers the raw edges. This sequence is standard for applique, so if you have done applique before, you can integrate this design without learning new techniques.
If you use embroidery software to combine designs, you can place the Owl with Pencil alongside other school-themed designs on a single hoop. For example, you might stitch a ruler, an apple, and the owl on a large tote bag in one hooping. Because the design is available in three sizes, you can scale it to fit the layout without worrying about distortion.
For those who sell finished embroidered items, the Owl with Pencil design works well as a standalone piece or as part of a larger composition. You can mix it with text, such as a child's name or a school year, by using digitizing software to merge the design with a monogram. This customization increases the perceived value of the final product.
After the Project: Quality Control and Packaging
After stitching, the design still plays a role in your workflow. Applique designs require trimming excess fabric close to the satin stitch line. The Owl with Pencil design typically includes a visible stitch path that guides your trimming. This step is critical for a clean finish. Using sharp, small scissors and trimming carefully after the tack-down stitch but before the satin stitch gives the best result.
If you are producing items for sale, inspect each stitch-out for thread breaks, fabric shifting, or loose stitches. The design's multiple hoop sizes mean you can test on a small item before committing to a large one, which reduces waste. Once you have a consistent stitch-out, you can batch produce items efficiently.
Long-term use of this design is straightforward. Because it is a machine file, you can stitch it hundreds of times without degradation. Store the files in a organized folder structure on your computer or external drive, grouped by theme or season. This makes retrieval fast when you need to restock items for the next school year.
Practical Implementation Tips
To get the best results from the Owl with Pencil design, consider the following factors that affect stitch quality and workflow efficiency.
Preparation and Compatibility
- Choose the right stabilizer. Applique designs benefit from a tear-away or cut-away stabilizer, depending on the fabric. For cotton or twill, a medium-weight tear-away works well. For stretchy or knit fabrics, use a cut-away stabilizer to prevent distortion.
- Match fabric types. The owl and pencil shapes are relatively simple, making them forgiving for beginners. Choose fabrics that fray minimally, such as felt, cotton, or poly-blend broadcloth. Prewash if the fabric may shrink.
- Test thread colors. The design likely comes with a color chart, but you may want to substitute colors to match your project palette. Run a test stitch-out on scrap fabric to confirm the look before stitching on final items.
- Check hoop compatibility. The three hoop sizes correspond to actual embroidery hoops available for most machines. Know the maximum hoop dimensions your machine supports before selecting a size.
Usability and Organization
Keeping your design files organized saves time. Create folders by category, such as "School," "Animals," or "Applique." Within each folder, store the design in all its available formats so you can quickly load the correct one. If you use a digitizing software that organizes designs by metadata, add keywords like "owl," "pencil," "school," "back to school," and "applique" to make searching faster.
If you run an embroidery business, consider creating a master spreadsheet that tracks which designs you use, how many times you have stitched each, and which thread colors you used. This helps with inventory planning and reordering supplies.
Efficiency and Consistency
Batch stitching improves efficiency. If you are producing multiple items with the same design, hoop multiple pieces of fabric at once using a multi-hooping technique. Alternatively, use a large hoop and stitch the design multiple times across a single piece of fabric, then cut the pieces apart. The Owl with Pencil design's simple shape makes it easy to nest multiple copies in a large hoop.
For consistency, document your settings. Write down the stabilizer type, thread colors, needle size, and tension adjustments you used for a successful stitch-out. The next time you stitch the design, you can replicate those settings without trial and error.
Use Cases Across Different Audiences
The Owl with Pencil design serves a wide range of users, each with distinct workflows and goals.
For hobbyists and parents: Personalizing school supplies for your own children is one of the most satisfying uses of this design. Stitch the owl onto a lunch bag, a pencil case, or the inside of a backpack. It helps children easily identify their belongings and adds a handmade touch that store-bought items lack.
For teachers and educators: Use the design to create classroom materials such as name tags, bookmarks, or reward patches. Because the design is machine-embroidered, it withstands repeated handling and washing better than iron-on patches or stickers. You can even stitch the owl onto a classroom banner or a "Welcome Back" display.
For small business owners and entrepreneurs: Add the Owl with Pencil design to your product catalog as a back-to-school offering. You can stitch it on tote bags, pouches, hats, or aprons. Because the design is available in multiple sizes, you can offer different price points. Customization, such as adding a name or monogram, allows you to charge a premium. The design's file format compatibility means you can take orders from customers who use different machine brands without needing to convert files manually.
For makers and creators who sell digital products: If you design embroidery files yourself, studying the Owl with Pencil design can teach you about applique layering, stitch density, and satin border techniques. You can use it as a reference when creating your own school-themed applique designs.
Long-Term Integration into Your Routine
Over time, the Owl with Pencil design becomes a reliable asset in your embroidery library. Because school-themed designs are seasonally in demand, you can use it year after year without the design going out of style. Store it in a "Seasonal" or "School" folder alongside other back-to-school motifs like apples, buses, and rulers. When the season approaches, you can quickly pull the file, restock your fabric stash, and start producing.
If you sell finished items, consider offering the design as a pre-order or limited-time option to create urgency. The design's three hoop sizes give you room to create a tiered pricing structure: small items at an entry-level price, medium items at a mid-range, and large items at a premium.
For those who teach embroidery classes or workshops, the Owl with Pencil design is suitable for teaching applique basics. The simple shapes and clear stitch path help students understand fabric placement, trimming, and satin stitching. You can use the design as a hands-on exercise in a beginner machine embroidery course.
Observations on Quality Control
Quality control is essential, especially when producing items for sale. With the Owl with Pencil design, pay attention to the following points:
- Fabric alignment: Applique relies on precise fabric placement. If the fabric shifts, the satin stitch may miss the edge. Use temporary spray adhesive or a glue stick to hold the fabric in place.
- Thread tension: Improper tension can cause the satin stitch to pucker or the fabric to show through. Test stitch a sample and adjust tension in small increments.
- Trimming: Trim fabric close to the tack-down stitch, but not so close that the satin stitch does not catch the fabric. Leaving a 1-2 mm margin is usually safe.
- Needle selection: Use a sharp needle designed for embroidery, such as a 75/11 or 80/12. A dull needle can cause skipped stitches or fabric snags.
By following these quality control steps, you ensure that every stitch-out meets a consistent standard, which builds trust with customers and reduces returns or complaints.
Final Thoughts on Integrating Owl with Pencil into Your Work
The Owl with Pencil machine applique embroidery design is a practical, versatile addition to any embroiderer's file collection. Its three hoop sizes give you flexibility, its wide format support ensures compatibility, and its applique construction adds tactile appeal to finished items. Whether you are preparing for back-to-school season, building a product line, or teaching others, this design fits naturally into your planning, stitching, and quality control workflows. By understanding the design's technical requirements and integrating it into your broader process, you can produce consistent, high-quality results that serve your audience effectively.