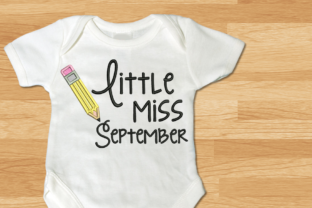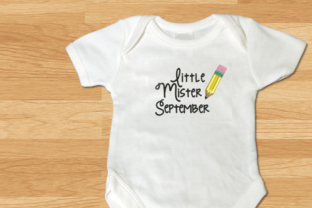
Little Mister September Pencil Applique Design Guide
If you enjoy documenting monthly milestones or creating personalized keepsakes, machine embroidery opens up a world of possibilities. The Little Mister September Pencil Applique design offers a charming way to mark the ninth month with a school-themed twist. Whether you are making a photo prop, a gift, or a small item for your own child, this design combines a cute sentiment with a practical applique element. Understanding what this design offers, how it works, and where it shines can help you decide if it fits your next project.
What Makes This Design Stand Out
Part of the Little Miss and Mister collection, this September design features the text “Little Mister September” paired with an applique pencil. The pencil shape adds a back-to-school or learning vibe that feels timely for the month. Unlike many embroidery-only designs, this one uses applique for the pencil, which gives the finished piece extra texture and dimension. Because the steps are separated by color changes, you can follow along easily without needing to manually sort or combine colors. If you work with a multi-needle machine, simply set it to stop for each color change so you can switch threads or fabric pieces as needed.
One detail worth noting is that in the 4×4 hoop size, some elements are embroidered rather than appliqued. This adjustment helps the design fit into a smaller hoop while still looking polished. For larger hoop sizes, the applique portions remain intact, giving you flexibility depending on the project scale.
Who Might Enjoy This Design
Parents who track their child’s first year or early childhood milestones often look for consistent monthly themes. The Little Mister September Pencil Applique fits naturally into a series of monthly photo props. If you already have designs for other months, adding this one completes your September setup. The design also appeals to those who enjoy sewing for others. Grandparents, aunts, uncles, or family friends who love handmade gifts can stitch this onto a onesie, bib, or small blanket for a September birthday or a back-to-school occasion.
For small business owners who sell custom embroidered goods, this design offers a quick way to add a seasonal item to your shop. You can personalize it with a child’s name or stitch it onto a towel, shirt, or tote bag. Because the design comes in 9 formats and 4 hoop sizes, you can work with most home embroidery machines without worrying about compatibility.
Practical Uses for Everyday Projects
The most obvious use for this design is a monthly photo prop. Many parents place their child on a blanket or in a chair with a themed item each month, then take a picture to track growth. The Little Mister September Pencil Applique works well stitched onto a plain muslin square or a small fabric banner. You can hold it next to the child or lay it flat as a backdrop element. The pencil shape gives a subtle school theme that suits September without feeling too literal.
Beyond photo props, consider stitching this design onto:
- A burp cloth or bib for a baby born in September
- A pillow or wall hanging for a nursery or child’s room
- A tote bag for a teacher or daycare provider
- A t-shirt or onesie for a monthly milestone photo session
- A small quilt block for a memory quilt
- A towel or robe for a September birthday gift
- A zipper pouch or pencil case for a school-themed set
- A fabric book or quiet activity page
Each of these projects benefits from the design’s clear lettering and recognizable shape. The applique pencil stands out against most backgrounds, so even a simple stitch-out looks intentional and professional.
What Beginners Should Know Before Starting
If you are new to applique embroidery, this design is a good introduction. The steps are clearly separated by color changes, which means you know exactly when to stop and add fabric for the pencil. You do not need to guess which color comes next or combine multiple thread colors into one step. Just follow the sequence as the file presents it.
For the 4×4 hoop size, remember that some parts switch to embroidery instead of applique. This is normal and happens because the smaller hoop cannot always accommodate fabric placement for every element. If you prefer a full applique look, choose a larger hoop size like 5×7 or 6×10. The zip file includes multiple sizes, so you can pick what works best for your machine and fabric.
Another tip for beginners: use a stabilizer that matches your fabric type. Tear-away stabilizer works well for cotton or poly-cotton blends, while cut-away stabilizer gives more support for stretchy fabrics like interlock or jersey. Test your stitch-out on a scrap piece first to see how the design behaves, especially the placement of the pencil fabric.
Considerations for Multi-Needle Machines
If you own a multi-needle machine, you can load the thread colors and let the machine handle the color changes automatically, provided you set it to stop for each change. This allows you to place the applique fabric at the right moment without rushing. Because the design does not combine or sort colors, each step remains distinct. You do not need to worry about the machine skipping a thread change or merging two steps into one.
For those who use single-needle machines, the process is similar but requires manual thread changes. The color change stops give you a clear signal to switch threads, which makes the workflow smoother than designs with unclear or missing stop points.
File Formats and Hoop Sizes Included
The zip file contains 9 embroidery file formats, which cover most major machine brands. Formats like PES, DST, EXP, JEF, HUS, VIP, VP3, XXX, and PCS are typically included, so whether you use Brother, Janome, Bernina, Pfaff, or Singer, you should be able to open and stitch the design without conversion. The 4 hoop sizes allow you to choose a dimension that fits your project. Common sizes include 4×4, 5×7, 6×10, and sometimes 8×8 or larger, depending on the design. This variety saves you from resizing or distorting the design later.
When you unzip the folder, keep the files organized by size or format so you can quickly find the correct file. Label your hoops or keep a reference guide if you switch between sizes often.
Creating a Monthly Photo Series
Many parents enjoy making a monthly photo series for their child’s first year. The Little Mister September Pencil Applique fits naturally into a set that includes designs for each month. If you are building a collection, look for other months from the Little Miss and Mister line. You can stitch each month onto a separate square or onesie, then photograph the child with the item. The consistent style across months creates a cohesive look that is pleasant to look back on later.
For example, you could stitch September’s design onto a white muslin square, then place it next to your child on a neutral blanket. The pencil and text stand out clearly, making the photo both simple and meaningful. If you want to add a personal touch, you can embroider the child’s name or the year somewhere on the fabric.
Gift and Business Opportunities
If you run a small embroidery business, seasonal designs like this one help you offer timely products without creating artwork from scratch. You can stitch the Little Mister September Pencil Applique onto items like burp cloths, baby blankets, or wall art, then list them in your shop for September birthdays or back-to-school events. Because the design includes multiple hoop sizes, you can create both small gifts and larger statement pieces.
For educators or daycare providers, this design works well for classroom name tags, cubby labels, or welcome banners. You could stitch each child’s name alongside the September theme, or use the pencil motif as a universal symbol for learning. Soft goods like fabric bins, book bags, or circle time mats could also feature this design.
Fabric and Thread Suggestions
For the applique pencil piece, choose a fabric that contrasts nicely with your background. Cotton fabric works well because it holds its shape and does not fray excessively. Prewash your fabric to avoid shrinkage after stitching. For the lettering and embroidery details, a polyester or rayon thread gives a slight sheen that reads well on camera. If you plan to use the item for a baby or young child, choose a thread that can withstand gentle washing.
Thread colors are separated by steps, so you can select a palette that matches your existing project or seasonal colors. For September, soft yellows, oranges, or greens work nicely, but you are not limited to those. The design looks clean with classic school colors like red, blue, or yellow.
Final Thoughts
The Little Mister September Pencil Applique design offers a practical, charming way to mark the ninth month with a handmade touch. Whether you are creating monthly photos, gifts, or products for sale, the design’s clear steps, multiple formats, and hoop sizes make it accessible for both beginners and experienced stitchers. By understanding how the applique and embroidery work together, you can plan your project with confidence and enjoy the process from start to finish.