Apple Split Applique Embroidery for Custom Projects
If you enjoy machine embroidery that lets you add a personal touch, the Apple Split Applique Embroidery design offers a creative twist on a classic subject. At first glance, it looks like a simple apple, but the clever split down the middle opens up space for your own text, monogram, or message. This design works well for teachers, students, hobbyists, and small business owners who want to create personalized items without starting from scratch. Whether you are new to applique or have been stitching for years, understanding what this design offers and how to use it can help you get the most out of every project.
What Makes the Apple Split Design So Useful
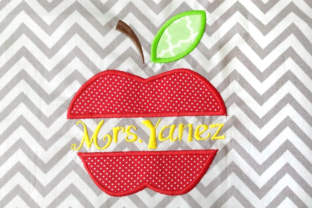
The Apple Split Applique Embroidery is not just another fruit motif. Its defining feature is the intentional split that runs through the center of the apple. This gap is designed specifically for adding your own lettering, which means you can customize each piece for a specific person, classroom, or event. The applique technique uses fabric pieces stitched onto a base fabric, giving the design a textured, layered look that feels substantial and polished.
Because the design comes as an applique, you get the benefit of covering larger areas with fabric rather than dense stitching. This saves thread and time while still producing a vibrant, professional result. The split detail adds visual interest and makes the design stand out from ordinary fruit appliques. You can choose contrasting fabrics for the apple body, the leaf, and the stem, or keep everything tonal for a more subtle effect.
The design is delivered in a zip file containing nine different embroidery formats and four hoop sizes, so it works with most machines right out of the box. Formats typically include PES, DST, EXP, HUS, JEF, VIP, VP3, XXX, and ART, covering brands like Brother, Janome, Bernina, Pfaff, and Singer. Having multiple hoop sizes means you can stitch the design on items ranging from small pockets and bibs to larger tote bags and aprons.
Who Will Find This Design Most Helpful
One of the strongest appeals of the Apple Split Applique Embroidery is how accessible it is for different skill levels. Beginners appreciate the clear step-by-step color changes that guide them through the process. More experienced stitchers value the flexibility to customize the text and experiment with fabric choices. The design naturally fits into several common scenarios.
For Teachers and Classroom Creatives
Teachers often look for ways to make their classroom feel welcoming and organized. This design works wonderfully for labeling student cubbies, creating personalized pencil cases, or adding names to book bags. The apple theme is classic for education settings, and the split gives you room to embroider each student’s name directly into the design. You can also use it for end-of-year gifts, teacher appreciation items, or classroom decorations. Because the design comes in multiple hoop sizes, you can adjust the scale depending on whether you are stitching a name tag or a larger wall hanging.
For Students and DIY Enthusiasts
Students who enjoy sewing or embroidery can use the Apple Split Applique to personalize their own belongings. Backpacks, laptop sleeves, hoodies, and hats all become canvases for this design. The process of choosing fabric, cutting the pieces, and stitching them down teaches valuable applique skills in a manageable project. Since the steps are separated by color changes, you can follow along without confusion. If you are just learning how to machine applique, this design gives you a clear path from start to finish.
For Small Business Owners and Craft Sellers
If you sell custom embroidery or personalized gifts, the Apple Split Applique Embroidery can become a reliable addition to your product lineup. The ability to add custom text means you can offer name items for back-to-school season, teacher appreciation week, or fall festivals. The design stitches out relatively quickly compared to dense fill patterns, which helps you maintain reasonable pricing while still delivering a high-quality product. You can also batch-produce items by preparing several pieces of fabric and stitching them in sequence.
Realistic Ways to Use the Apple Split Applique
Practical uses for this design go beyond the obvious classroom applications. Here are several examples that show its versatility:
- Personalized gifts: Embroider a child’s name on a towel, onesie, or pillowcase using the split area. The apple motif works for birthdays, holidays, or just because.
- Event favors: Create custom items for a fall-themed party, apple orchard visit, or harvest celebration. Small hoop sizes work well for keychains or ornament-style projects.
- Home décor: Stitch the design onto kitchen towels, oven mitts, or a small wall hanging for a farmhouse or rustic look. The split can hold a family name or a short word like “gather” or “harvest.”
- Fundraising items: Schools or clubs can produce custom merchandise with student names or a group logo incorporated into the apple split. This makes for a memorable keepsake that supports a cause.
- Learning tools: Use the design to teach applique techniques in a workshop or sewing class. The separate color changes make it easy to pause and explain each step.
The four hoop sizes give you room to adapt. A small hoop might be perfect for a bib corner or a hat front, while a larger hoop works for the center of a tote bag or a quilt block. You are not locked into one scale, which makes the design more useful across different projects.
What to Keep in Mind Before You Start Stitching
A few important details will help you avoid frustration and get good results with the Apple Split Applique Embroidery. First, the steps in the design are separated by color changes, and you should not color sort or combine colors. Each color change represents a logical stage in the applique process: tacking down the fabric, stitching the satin border, adding details, and so on. If you use a multi-needle machine, set it to stop for color changes rather than trying to merge them. This gives you time to trim threads, place fabric pieces, or swap thread colors as needed.
Second, because this is an applique design, you will need to supply your own fabric for the apple, leaf, stem, and any background elements. Choose fabrics that do not fray too much and that hold up to washing. Cotton quilting fabric is a reliable choice for most projects. Pre-washing your fabric can prevent shrinking later. You will also need a stabilizer appropriate for your fabric type and hoop size. Tear-away or cut-away stabilizer works well for applique, depending on the base fabric.
Third, pay attention to the text placement area. The split in the apple provides a specific zone for your lettering, so plan your words accordingly. Short names or words up to about six to eight characters tend to fit comfortably, depending on the hoop size and font you choose. If you want longer text, test the layout in your embroidery software first or adjust the font size to fit the space. The design works best with single-line text that sits neatly within the split.
The zip file includes nine formats, so you should be able to load the design into most machines without conversion issues. If your machine uses a format not listed, you can use free or paid conversion software to change the file. Keep the original file structure intact inside the zip folder so you can access all sizes and formats later.
Making the Most of the Included Formats and Hoop Sizes
Having nine formats and four hoop sizes in one download means you can use the same design on different machines and for different projects without buying it multiple times. The hoop sizes typically range from around 4x4 inches up to about 6x10 inches, though exact dimensions depend on the specific file. The smallest size is ideal for items like bibs, burp cloths, or small pouches. The largest size works well for the back of a jacket, a large tote, or a wall hanging.
Because the design uses applique, the stitch count stays relatively low even at larger sizes. This is a practical advantage if you are stitching multiple items or working with a machine that handles high stitch counts slowly. You also use less thread, which can add up to significant savings if you produce items in quantity.
To get the best results, test the design on a scrap piece of fabric before stitching your final project. This lets you check the text fit, confirm the color change order, and see how the applique edges look. Adjust your tension and stabilizer choice based on the test piece. Once you are satisfied, you can stitch with confidence on your actual item.
Final Thoughts on This Versatile Design
The Apple Split Applique Embroidery offers a thoughtful blend of creativity and practicality. The split detail transforms a simple apple into a customizable canvas for names, words, or short messages. Teachers and students will find it especially useful for classroom personalization, while craft sellers and hobbyists can adapt it for gifts, home décor, and seasonal items. The range of formats and hoop sizes removes technical barriers, making the design accessible whether you use a single-needle or multi-needle machine.
As you plan your next project, consider how the apple split layout can support your goals. Maybe you want to create a set of personalized gifts for a class of students, or perhaps you are looking for a fall-themed design that still leaves room for customization. Either way, this design gives you a structured but flexible starting point. With a little fabric, some thread, and a clear sequence of color changes, you can produce professional-looking items that feel personal and intentional. That combination of ease and adaptability is what makes this applique design a worthwhile addition to any embroidery collection.


