100 Days Bright Applique: A Thoughtful Design for Celebrating the 100th Day of School
The 100th day of school is a milestone that many classrooms celebrate with creativity and enthusiasm. For parents, teachers, and caregivers, finding a meaningful way to mark the occasion often involves personalized clothing, accessories, or keepsakes. The 100 Days Bright Applique offers one approach: a light bulb design paired with the text “100 Days Bright,” intended to commemorate a child’s 100th day of school. This machine embroidery design comes in nine formats and four hoop sizes, delivered in a zip file, and the steps are separated by color changes. Understanding what this design offers, how it compares with other options, and where it fits best can help you decide whether it aligns with your project goals.
What Makes 100 Days Bright Applique Distinct
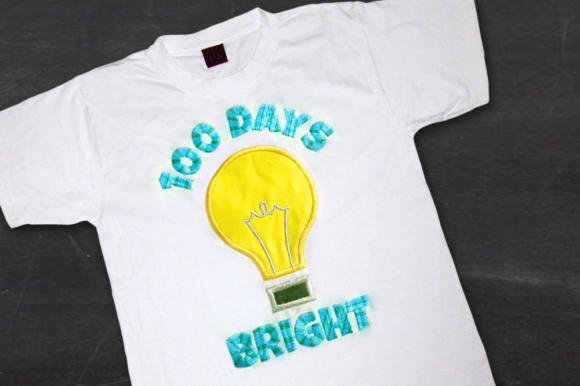
At its core, this design combines a symbolic motif—a light bulb—with a celebratory message. The light bulb evokes ideas of brightness, ideas, and energy, which fits naturally with a school milestone. The applique technique means that fabric pieces are stitched onto a base fabric, adding texture and dimension that standard embroidery alone does not provide. The design includes multiple file formats, which broadens compatibility across different embroidery machines, and the four hoop sizes give flexibility for placement on shirts, tote bags, blankets, or other items.
The instruction to avoid color sorting or combining colors is a notable detail. The steps are separated by color changes, and if you are using a multi-needle machine, you are advised to set it to stop for color changes. This means the design expects a specific order of stitching, and altering that order could change the final appearance. For those who prefer to let a multi-needle machine run continuously, this requirement may feel restrictive. For others, the color change stops provide a chance to trim threads, press seams, or check alignment between steps.
Another distinct aspect is the inclusion of nine formats. Common formats like PES, DST, EXP, JEF, HUS, VIP, and others are typically covered, which reduces the need for file conversion. The four hoop sizes—often ranging from small 4x4 hoops to larger 5x7 or 6x10 hoops—allow you to scale the design to fit different garments or projects. The zip file delivery is standard for machine embroidery designs, but it is worth noting that you will need to unzip the files before transferring them to your machine.
How This Design Compares with Other 100th Day Celebratory Options
When planning a 100th day project, you have several routes. Some people choose iron-on transfers or printable heat transfer paper, which can be applied at home with a household iron. These options are generally faster and require no embroidery machine, but they lack the texture and durability of stitched designs. Iron-ons can peel or fade after washing, while an applique design like 100 Days Bright Applique, when properly stitched, tends to hold up better over time.
Another alternative is purchasing pre-made shirts or patches from online marketplaces. Pre-made items save time, but you have limited control over fabric choice, size, and placement. With a machine embroidery design, you select the base fabric, the applique fabric, and the thread colors, which gives you more creative freedom. The 100 Days Bright Applique design includes both the light bulb and the text, so you do not need to combine separate design files or adjust spacing yourself.
Some embroiderers prefer full embroidery designs—where the entire image is created with thread stitches rather than fabric pieces. Full embroidery can achieve fine details and gradients, but it often uses more thread and may feel heavier on lightweight fabrics. Applique reduces thread usage and can produce a softer, more dimensional look. The tradeoff is that applique requires fabric preparation, such as cutting and positioning pieces, and may need more stabilization to prevent shifting. If you are experienced with applique, the 100 Days Bright Applique design offers a straightforward project. If you are newer to the technique, you may want to practice on scrap fabric first.
Simple text-only designs are another common choice for 100th day shirts. A design that says “100 Days Smarter” or “100 Days Brighter” in a single color is quick to stitch and works well for mass production. The 100 Days Bright Applique design adds an image element, which makes it more distinctive but also more time-consuming. The light bulb motif also gives you the opportunity to use a bright or metallic fabric for the bulb itself, which can make the design pop.
Strengths and Tradeoffs of the 100 Days Bright Applique Design
Strengths include the design’s thematic fit for the 100th day, the combination of text and imagery in one file, and the multiple formats and sizes. The applique technique offers a tactile result that stands out from flat embroidery or printing. The color change stops allow you to control the stitching process, which can be helpful for aligning applique pieces precisely. The design also makes a nice keepsake—parents may appreciate having a shirt or blanket that marks the milestone in a handcrafted way.
Tradeoffs involve the need for an embroidery machine and the time required to stitch the design. Applique generally takes longer than simple embroidery because you pause to place fabric pieces and may need to trim excess. The color change requirement means you cannot set a multi-needle machine to run unattended unless you are comfortable with the design stitching all colors in sequence without stops—but the instructions recommend against that. If you are producing multiple shirts for a whole class, this design’s per-item time may be higher than a simpler design.
Another tradeoff is the learning curve for applique. If you have never done applique before, you will need to understand how to hoop the base fabric, apply stabilizer, position the applique fabric, and trim after tack-down stitches. The design files themselves are well-structured, but the technique requires some practice. For experienced embroiderers, these steps are routine.
The zip file contains multiple formats, but you need to ensure you select the correct format for your machine. Most machines read one or two formats, so you will likely only use one file from the set. The extra formats are useful if you plan to share the design with others who have different machines, or if you own multiple machines. The four hoop sizes give you flexibility, but you must check that the largest size fits within your hoop’s maximum dimensions. A 4x4 hoop may only accommodate the smallest version, which could limit placement on adult-sized shirts.
Best-Fit Situations for 100 Days Bright Applique
This design is well-suited for individual projects where quality and personalization matter. A parent making a shirt for their own child, a teacher creating a special classroom banner, or a caregiver stitching a keepsake blanket would all find the design practical. The applique style works nicely on cotton, denim, fleece, and other stable fabrics. If you are using a lightweight knit, you may need extra stabilizer to prevent puckering.
The design is also a good choice when you want to involve the child in the process. Because applique uses fabric pieces, you can let the child choose the fabric for the light bulb—perhaps a yellow polka dot, a metallic gold, or a fabric with a pattern they love. That personal touch makes the final item more meaningful.
For group settings, such as making shirts for a sibling or for a small group of students, the design is still feasible, but you should account for the extra time per item. If you are making 20 or more shirts, a simpler embroidery-only design or a heat transfer might be more efficient. However, if the goal is a special gift for a few children, the additional effort is often worthwhile.
Teachers who have access to an embroidery machine at school or through a parent volunteer can use the design for a class project. A banner that reads “100 Days Bright” with each child’s name added below the light bulb could be a collaborative piece. The multiple hoop sizes make it possible to stitch the design on a larger fabric panel that can be framed or hung.
Limitations and Considerations to Keep in Mind
One limitation is that the design is specifically for the 100th day of school. If you want a design that works for other milestones, such as the first day of school or graduation, you would need a different file. The 100 Days Bright Applique is not a multi-purpose design, so its use window is limited to a specific time of year for most families.
The color change requirement may be a drawback for those who prefer to minimize thread changes. While single-needle machine users are accustomed to changing thread per color, multi-needle users often rely on the machine changing colors automatically. Setting the machine to stop for each color change interrupts the workflow. If you want to avoid stops, you could try to reassign thread colors in your software to run sequentially, but the design instructions advise against color sorting. This means the design is optimized for a specific stitching order, and altering it could affect how the layers align.
File format compatibility is generally good, but it is always wise to verify that your machine reads one of the included formats. Common formats like PES (Brother, Babylock), DST (Tajima), and JEF (Janome) are typically covered, but less common machines may require conversion. The zip file does not include a PDF or photo of the design, so you may need to open the file in embroidery software to preview it before stitching.
Another consideration is the skill level required for applique. If you are new to machine embroidery, starting with a simple design that uses fewer color changes and no fabric layering may be more comfortable. The 100 Days Bright Applique is not extremely complex, but it does involve at least one or two applique fabric placements, which means you need to be comfortable with basic applique steps like tack-down, trim, and cover stitch.
Decision Factors to Help You Choose
When evaluating whether 100 Days Bright Applique is the right choice for your project, consider the following:
- Your machine’s capabilities: Does your machine read one of the nine formats? Can it handle the largest hoop size you want to use? If you have a multi-needle machine, are you comfortable setting it to stop for color changes, or do you prefer designs that allow continuous stitching?
- Your experience with applique: If you have done applique before, this design will be straightforward. If not, factor in time to learn and practice. Watching a tutorial or two can help, but your first attempt may not be perfect.
- Project quantity: For one or two items, the time investment is manageable. For larger batches, consider whether the unique look justifies the extra effort, or whether a simpler design would serve better.
- Desired durability and texture: If you want a design that feels dimensional and lasts through many washes, applique is a strong choice. If you prefer a flat, uniform look, full embroidery or heat transfer may be more appropriate.
- Fabric choice: The design works best on medium-weight, stable fabrics. If you plan to stitch on a t-shirt knit, use a cutaway stabilizer and test the design on a sample first to check for puckering.
- Timing: The 100th day of school arrives quickly. Make sure you have enough time to source materials, stitch the design, and finish the garment before the celebration.
Comparing 100 Days Bright Applique with other options—such as iron-on transfers, pre-made shirts, full embroidery designs, or simple text files—shows that there is no single best choice. Each approach has its own set of tradeoffs. The applique design offers a handmade look, dimensional texture, and the ability to customize fabrics, but it requires more time, equipment, and skill. For many parents and teachers, the result is worth the effort. For others, a quicker method may be more practical.
If you already enjoy machine embroidery and have some experience with applique, this design is a natural fit for the 100th day. If you are considering it as your first applique project, start with a small hoop size and practice on scrap fabric before stitching the final item. The design’s clear color changes and multiple formats make it accessible, but like any embroidery project, preparation and patience improve the outcome.
Ultimately, the 100 Days Bright Applique design stands out because it combines a meaningful symbol with a versatile delivery format. The light bulb motif is simple enough to recognize instantly, and the applique technique gives it a handmade quality that printed designs cannot replicate. Whether you choose this design or another route, the most important factor is that the final piece celebrates the child’s achievement in a way that feels personal and lasting.


